Go Caves!
Quite recently Cogmind alpha was released. As it happens I am also playing Brogue from time to time for last couple of months. This once again made me want to write my own roguelike, which reminded me that I’ve already seen two nice tutorials on how to write roguelike:
- Original by Trystan
- Caves of Clojure port of Trystan’s tutorial to Clojure by Steve Losh
Adding another one might be fun experience and in the process I might finally end up with small game that I always wanted to write. As far as language, I’m going to use Go. If you want to follow along and have never used it I can recommend short introduction available at A Tour of Go.
Project setup
In Go there is well defined standard structure for code (for detailed description of it see How to Write Go Code). In short I’m going to start with main package located at ~/src/bitbucket.org/$USER/gocaves. In future I might need to extract some packages but for right now this will suffice. If you want to follow along you will have to create folder structure that mimics your own repository url.
Termbox
For interacting with terminal I’m going to use excellent library termbox-go. In contrast to AsciiPanel used by Trystan and Lanterna used by Steve, termbox is pure terminal based solution without any means of rendering to gui based terminal emulators. I’m a little bit worried that updating full large terminals might get slow. If that becomes a problem I will deal with it then, for now this will be more than enough for my modest needs.
To install termbox for Go you should use go tool:
go get -u github.com/nsf/termbox-go
Apart from setting up Go workspace this is all there is to do before starting.
gocaves.go
For now I’m going to stick with just one file called gocaves.go.
The Main
Since termbox is much smaller library I will have to do just a little more than Steve. Starting from the entry point this is my main function:
func main() {
	start()
	defer stop()

	events := make(chan termbox.Event)
	go poolEvents(events)

	for running {
		select {
		case ev := <-events:
			processEvent(ev)
		case <-time.After(100 * time.Millisecond):
			renderGame()
			termbox.Flush()
		}
	}
}
The start and stop function are there to set up and tear down some global services and I will explain them in a moment.
Next comes, first somewhat Go specific construct. For interaction with outside world (meaning keyboard) I will use goroutine. It’s like a thread but much less resource consuming. To communicate which events have been generated by keyboard I will use a channel which is just a thread safe bounded queue. So the pollEvents function will be running in the background collecting keyboard events and pushing them to channel events.
The Game Loop
The rest of main is so called main game loop. It needs to do two things. First it needs to handle all of players input, second it needs to render current game view for the player.
Since I’m using channel to provide queue of input events I will need to somehow access those events. Reading values from channel can be done in one of two ways. You can either read in a blocking way or nonblocking way. In this case this needs to be nonblocking so that if user stops pressing buttons game will have a chance to render in between key presses. This might sound strange if you think about it from classical roguelike point of view. After all roguelikes are turn based and any changes in the game happen in reaction to player actions. With that simple model I could just block main loop for as long as there is no input from the player. But this also means that if I want to animate anything on the screen I won’t be able. So to make animations possible I need to maintain constant framerate regardless of player input.
This is achieved with select statement. It itself blocks on many sources of inputs and unblocks first case that is ready for execution. In this case this means that whenever player presses any button, event loop will process this immediately but every 0.1s game will be rendered anew. start()
The function:
func start() {
	runtime.GOMAXPROCS(runtime.NumCPU())
	f, err := os.Create("gocaves.log")
	if err != nil {
		log.Fatalln(err)
	}
	logger = log.New(f, "", log.LstdFlags|log.Lshortfile|log.Lmicroseconds)
	if err := termbox.Init(); err != nil {
		logger.Fatalln(err)
	}
	termbox.SetInputMode(termbox.InputMouse | termbox.InputEsc)
	logger.Println("Game started.")
}
This could have been shorter. The only required section is the call to termbox.Init which starts and initializes any termbox specific services. I’ve added three things:
- Logger - this will make it easy to log from any part of the program and examine that log after game ends or even while it’s running.
- Extended input mode - termbox allows to intercept mouse clicks on terminal and enabling this is so easy that I could not resist.
- By default Go uses only one OS thread. Calling GOMAXPROCS with NumCPU tells Go runtime to exploit all hardware threads in the CPU game is running on.
stop()
func stop() {
	termbox.Close()
	logger.Println("Game ended.")
}
Little explanation needed - termbox requires to have Close called before program exit and that’s all to be done here.
pollEvents
func pollEvents(events chan termbox.Event) {
	for {
		events <- termbox.PollEvent()
	}
}
Once again simple function - infinite loop in which we wait for any user input and put it on channel.
Rendering
func setString(x, y int, s string, fg, bg termbox.Attribute) {
for i, ch := range s {
termbox.SetCell(x+i, y, ch, fg, bg)
}
}
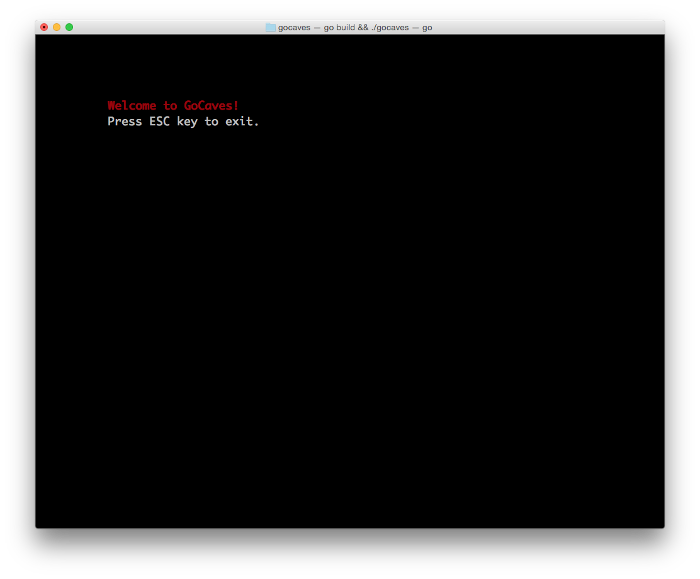
func renderGame() {
setString(10, 4, "Welcome to GoCaves!", termbox.ColorRed|termbox.AttrBold, termbox.ColorBlack)
setString(10, 5, "Press ESC key to exit.", termbox.ColorWhite, termbox.ColorBlack)
}
Before rendering any text there needs to exits function which is capable of that. Since termbox provides only basic building blocks I need to make one. The setString function iterates over all characters in string and puts them in the same row one after the other.
Which brings us to the renderGame itself. All it needs to do is to call setString to show our player welcoming message and instructs her how to exit this exiting game.
Final result
The final result can be downloaded from Bitbucket. This specific entry is tagged as entry01. Finally it can be built and run using go tool:
go build && ./gocaves
Which looks like this: